
This is a tutorial on how to create a filter in Gmail. You can use these Gmail tips and hacks to quickly clean up your email inbox whether you use a personal Gmail account or G Suite.

Let's face it – we all get a lot of email.
Some of it is important – as in the read it now, it can't wait, emergency kind of way.
But much of our email is kind of repetitive in nature. It's stuff that we may need in the future – but don't necessarily want to deal with right now.
And it is this non-urgent stuff that can really clog up our inboxes.
The good news is that Gmail has a built-in tool that can help you clean up your inbox – and keep it that way – automatically.
Or should I say automagically?
So, maybe I am replacing a few clerical jobs out there by teaching you this trick – but it comes in pretty handy at times.
Before we get started … be sure to subscribe to our newsletter to get this tutorial and more like it in your inbox.
Let's Start With An Example
Let's say that you receive a lot of emails from the ABC Department Store.They send you tons of email with coupons and information about sales.
These emails are useful to you – but ONLY when you plan to go shopping at ABC.
The rest of the time they just clog up your inbox.
And then – when you actually do go shopping at ABC – you can't find the email with the latest coupon – so you don't get the discount anyway. 🙁
To make sure that you never experience this frustration again, you can set a filter in Gmail to automatically skip your inbox and send all emails that you receive from ABC to a specific folder (in Gmail this is called a Label).
You can further process these emails that you receive from ABC so that they are marked as read.
Now, when you happen to pop into the ABC Department Store – you can open the ABC email folder on your smartphone and quickly find the latest coupon to show to the cashier at checkout.
Cha-ching!
Now, before I explain how you you can quickly clean up your inbox – think about this.
Blogging involves a lot more than just creating content. Little technology tips like this one can make your whole day much more productive.
And, yes, I do see the irony in asking you to subscribe to receive more email – when I am explaining how you can clean up your email inbox.
But, I think it will be worth it. 😉
How to Create a Filter In Gmail Step By Step
The tool you need to create a filter in Gmail is called “Filters”. This is how you create a filter in Gmail (or in G Suite – formerly Google Apps for Work – if you use it for your business).
Go To Gmail Settings
The first thing you do is open up your Gmail account in a browser. (Even if you get your email in Apple Mail or Outlook – you will need to set up the Filter directly in Gmail on the web).

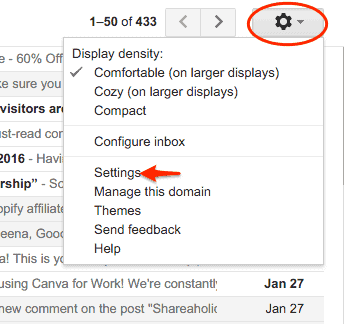
In the upper right hand corner of your screen – you will see a little gear icon. Click on this.
In the dropdown, select Settings. (See the screenshot above.)
Find the Filters Tab
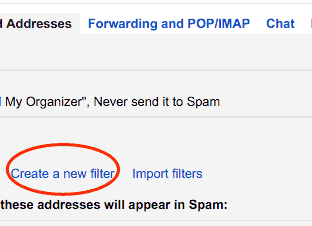
Next, you will click on the “Filters and Blocked Addresses” tab in the Settings window as seen in the screenshot above.
Create a New Filter

The next step to create a filter in Gmail is to click on the “Create a new filter” link in the middle of the window that appears.
Set the Criteria For Your New Filter

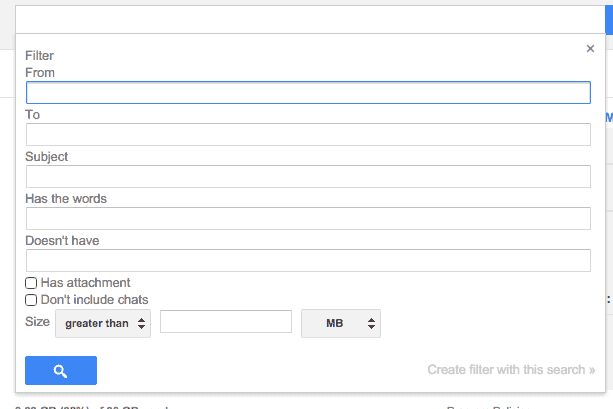
In the box that opens up, you will set your criteria for the Filter.
What this means is that you can choose which emails you want the Filter to apply to.
As you can see from the above screenshot – you can use a variety of criteria to filter your email.
You don't need to fill out every line item in this form – just the ones that apply to what you want to accomplish.
In our example, we would type in the from email address to find all of the emails that come from ABC.
You would find the “From” email address by opening an email that you already received and copying the address of the sender.
In fact, gmail is pretty smart this way. You don't even need to type in the whole email address. You could just type in, for example – ABCDepartmentStore – if that is in the from address – and it will find all emails that come from senders on that domain.
When you have set your criteria – you click on “Create filter with this search” in the bottom right-hand corner. (You can see it in the above screenshot in the bottom right – I don't know why Google makes the typeface so small and hard to notice.)
Set The Actions for Your Filter

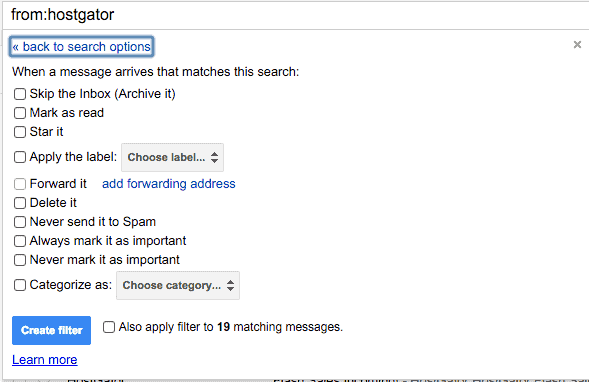
The next screen that opens up is where you will set the actions for your new filter in Gmail.
On this screen, you will tell Gmail what to do when it finds an email that matches the criteria that you set in the previous step.
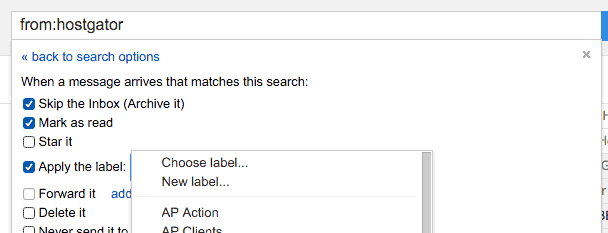
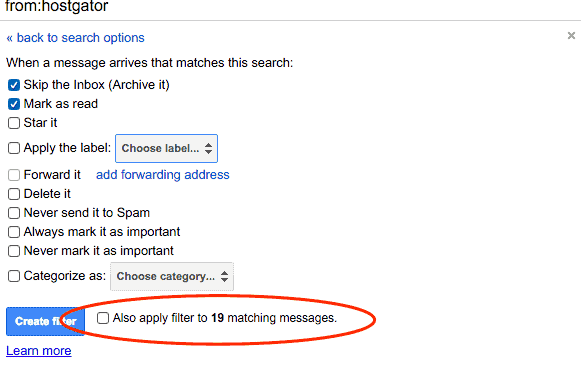
In our ABC example, we would check the first box to skip the inbox. Then we would check the second box to mark it as read. Finally we would check the box next to “Apply the Label:”. In the dropdown next to this option, we would pick the label that we want. If we don't have an existing label that we want to use we can create a new one here as well. (see below.)

An Amazingly Useful Gmail Tip
Here is a sneaky little tidbit that will have you down to inbox zero in no time.
When you create a filter in Gmail, you can have it apply to emails that are already in your inbox as well as the new emails that come in from this day forth.

On the screen where you select the actions for your filter – there is a checkbox next to the create filter button.
In the screenshot above – you can see that Gmail has found 19 emails that are already in my inbox that match the criteria for my filter.
If I check this box – Gmail will take these emails and process them too.
So, let's say ABC has sent me emails in the past that are clogging up my inbox. Gmail will take them out of my inbox, mark them as read, and assign them the proper label.
A Word on Labels and Folders
If you use Apple Mail to check your Gmail – your Gmail “labels” become “folders” in the Apple Mail interface.
You may want to set some practice filters for more unimportant type emails. This is just to see how Gmail will process them and also where they end up in your Apple Mail.
You may need to adjust some of your sync settings in Apple Mail or another email client to make sure ever.
Share...
No comments:
Post a Comment